Showing posts with label jar. Show all posts

Monday, April 16, 2012

Life is just too short for ironing - Kimono water Lily jar

As you can see by the tablecloth in this picture of my recent attempt at a water lily flower I dont iron. I dont iron on principle (and because life is just too short). In the 60s when we were all encouraged to burn our undies I thought that the ironing board and not the bra was the true symbol of womens enslavement to the home. The term Housewife implies marriage to the home doesnt it?
Anyway enough of that you will say (if you have any sense) :)
This flower uses the Donna Kato 'component caning' method where a picture is built up using small parts (one petal cane can create many different flowers).


Another view of the Kimono water Lily jar showing the leaves and the peacock cane background. There was a space when I applied the veneer as I hadnt intended it for a jar but had to use it quickly as it was drying out.


I filled the space with scrap clay and some end slices of a butterfly cane I made recently and used a few slices of the petal cane to create a blossom for the butterfly. The petal cane uses white and flourescent pink Premo clay and it really pops as you will see in the next post.

Monday, February 27, 2012

Kimono honey jar and Altoids tin

Here is a jar I covered with the last few slices from the end of my Japanese flower canes and a few slices of a transparent clay and metal leaf jellyroll cane (you can just see a slice of this one on the right side of the rim). I rather like this jar.


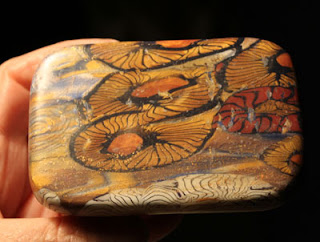
Here is an Altoids mints tin covered with the remains of the sheet used for the Kimono jar. There were a few breaks in the surface as the canes are pretty old and dry so I put a thin layer of Premo Frost on top before firing this filled in the gaps and gave a lovely surface to sand and polish. It feels really nice to the touch as the surface is so smooth and the colours and detail of the canes is only slightly dimmed by the extra layer..

Monday, February 20, 2012

How to cover a jar with Polymer clay

Hi again,
apologies for my tardyness but here I am again at last and I have got something to show you.
I have been covering honey jars with polymer clay to make paint brush/clay-tool/pen pots

This is Dark Jar :). It's mean and moody and lives in the jungle.

---------------------------------------------------------------------------------------------------------------------

How to cover a jar with Polymer clay

 
I took a round bristle hairbrush and removed the bristles to expose the holey metal drum (thanks for the idea Rebecca Thickbroom).  

I made simple bulls eye canes from black clay with one flourescent clay circle in each. I used flourescent pink, yellow and red

I bunched the canes together and then flattened the group with a roller until it went through the pasta machine at #1.

Then I cut the flattened piece in half across the width and stacked the pieces and rolled with a roller to stick the layers together.

The next step was to roll the metal drum of the mutilated hairbrush across the surface to get round bobbles raised on the surface which were then shaved off carefully with a sharp tissue blade.

I then flattened the stack gently with a rubber roller and took thin slices from the surface which were pieced onto a sheet of scrap clay to form the sheet which covered the jar.

I had previously cut the ends of the canes off after the initial squashing together with the roller and put this piece through the pasta machine and used it to fill in the gap where the sheet was not big enough to cover the jar, making the big circles you can see in pictures 2 and 3.


TIPS.
When covering your jar first remove all paper labels and wash and dry thoroughly
.
Leave the bottom of the jar uncovered so you can easily find small objects at the bottom during use.
Carefully apply the polymer clay sheet to the surface trying to exclude air bubbles where possible. Prick any remaining air bubbles with a sharp pin and tap around the hole gently to force out the air. you can then 'heal' the hole with the warmth of your hand.

Roll the covered jar gently between your palms to flatten the surface as much as you can before firing. Be careful not to thin the clay too much in one place as this will weaken the surface.
.
Fire the jar on a flat piece of card and do NOT fire it with the lid on or it may explode.
Related Posts Plugin for WordPress, Blogger...